How to Make Sourdough Bread Starter: Your Ultimate Guide
how to make sourdough bread starter

How to Make Sourdough Bread Starter: Your Ultimate Guide

Transform simple flour and water into a vibrant, bubbling sourdough starter that will elevate your baking.

Start Your Sourdough Journey

Key Takeaways

  • ✓ Sourdough starter is a living culture of wild yeast and bacteria.
  • ✓ It requires only flour and water to create.
  • ✓ The process typically takes 5-7 days to establish a robust starter.
  • ✓ Regular feeding is essential for maintaining its activity and health.

How It Works

1
Combine Flour & Water

Mix equal parts of whole wheat flour and water to begin cultivating wild yeasts present in the environment. This initial mixture sets the stage for microbial growth.

2
Daily Feeding Cycle

Discard a portion of the starter and feed it fresh flour and water daily. This process removes metabolic waste and provides new nutrients for the thriving microbial community.

3
Observe Activity

Watch for signs of fermentation: bubbles, a pleasant sour aroma, and an increase in volume after feeding. These indicators confirm your starter is becoming active and strong.

4
Mature & Bake

Once consistently active, your starter is ready to leaven bread. A mature starter will reliably double in size within a few hours after feeding, indicating peak readiness.

Understanding the Magic Behind Your Sourdough Starter

Close-up of freshly baked artisan sourdough bread on a rustic wooden board. 
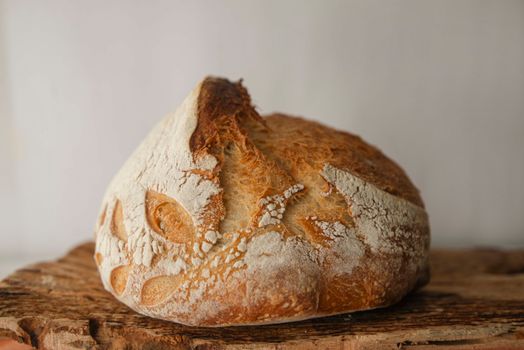
Photo: Natalia Olivera / Pexels
Embarking on the journey of how to make sourdough bread starter is more than just mixing flour and water; it's about cultivating a living ecosystem. At its heart, a sourdough starter is a symbiotic culture of wild yeasts and lactic acid bacteria (LAB) that exist naturally in our environment, on grains, and even in the air around us. When you combine flour and water, you're providing these microscopic organisms with a food source and a hospitable environment to multiply. The wild yeasts are responsible for producing carbon dioxide gas, which creates the airy structure and rise in your bread. The lactic acid bacteria, on the other hand, contribute to the distinctive tangy flavor and also help preserve the bread. This intricate dance between yeast and bacteria is what gives sourdough its unique characteristics, making it not just a leavening agent but also a flavor enhancer. Understanding this fundamental biology is key to successfully nurturing your starter. It explains why consistency in feeding, temperature, and observation are so crucial. Think of your starter as a pet; it needs regular care, the right food, and a suitable home to thrive. The type of flour you choose, the temperature of your kitchen, and even the water you use can all influence the microbial balance and the speed at which your starter develops. For instance, whole grain flours, like rye or whole wheat, often contain a higher concentration of wild yeasts and nutrients, which can kickstart the fermentation process more quickly than all-purpose white flour. However, a robust starter can be maintained with various flours once established. The initial days of creating a starter might seem slow, with little activity. This is normal. It's a period where different microbial communities are establishing themselves, competing, and eventually finding a balance. Patience is truly a virtue in this process. You'll observe subtle changes, from small bubbles to a slight change in aroma, signaling that life is stirring within your jar. The goal is to cultivate a strong, active starter that consistently doubles or triples in volume after feeding, indicating it has enough leavening power to make a beautiful loaf of bread. This understanding forms the bedrock of successful sourdough baking, allowing you to troubleshoot issues and adapt your process as needed. Explore more about the science of baking here.

Gathering Your Essentials: What You Need to Get Started

Delicious homemade waffles served with fresh blueberries for a perfect breakfast. 
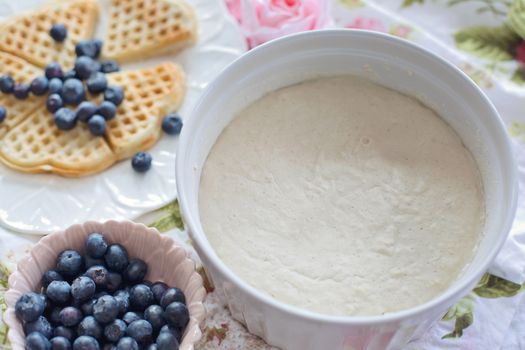
Photo: Jill Wellington / Pexels
Before you dive into the exciting process of how to make sourdough bread starter, gathering the right tools and ingredients will set you up for success. Fortunately, the list is short and inexpensive, making this a highly accessible baking endeavor. First and foremost, you'll need flour. While you can eventually transition to all-purpose flour for maintenance, starting with a whole grain flour like whole wheat or rye is highly recommended. These flours contain more natural microbes and nutrients, which significantly boost the initial fermentation process. Organic flour is often preferred as it's less likely to contain residues that could inhibit microbial growth. You'll also need water. Unchlorinated water is crucial because chlorine can kill the beneficial microbes you're trying to cultivate. If your tap water is chlorinated, simply leave it out in an open container for 24 hours, and the chlorine will dissipate. Alternatively, use filtered or bottled spring water. Next, you'll need a suitable container. A glass jar with a wide mouth, such as a quart-sized Mason jar, is ideal. Glass allows you to easily observe the activity of your starter, and a wide mouth makes feeding and stirring convenient. Avoid airtight lids during the initial fermentation; instead, use a loose-fitting lid, a piece of cloth secured with a rubber band, or even plastic wrap with a few holes poked in it. This allows air exchange while preventing contaminants. You'll also need a kitchen scale. This is perhaps the most critical tool for accuracy. Sourdough baking relies on precise ratios, and measuring by weight (grams) is far more accurate and consistent than measuring by volume (cups). A digital kitchen scale that measures in grams will be your best friend throughout your sourdough journey. Lastly, you'll need a rubber spatula or a wooden spoon for mixing. Avoid metal spoons, especially during the initial stages, as some believe metal can react with the starter, though this is largely anecdotal. A clean, non-reactive utensil is best. Optional but helpful items include a thermometer to monitor your kitchen's ambient temperature (ideally 70-78°F or 21-26°C) and a jar marker or rubber band to track your starter's growth after feeding. Having these essentials on hand before you begin will streamline the process and allow you to focus on the fascinating transformation taking place in your kitchen.

The Daily Ritual: Step-by-Step Guide to Nurturing Your Starter

A sophisticated dining setup featuring fresh bread in a silver dish, perfect for weddings or gatherings. Photo: Jonathan Borba / Pexels
The process of how to make sourdough bread starter is a daily commitment, but a rewarding one. Follow these steps carefully, and you'll soon have a thriving starter ready for baking. **Day 1: The Beginning** In a clean glass jar, combine 50 grams (about 1/4 cup) of whole wheat or rye flour with 50 grams (about 1/4 cup) of unchlorinated water. Mix thoroughly with a rubber spatula until no dry clumps remain and the mixture is smooth. It will have the consistency of a thick batter. Cover the jar loosely with a lid or plastic wrap, ensuring some air can get in. Place it in a warm spot in your kitchen, ideally between 70-78°F (21-26°C). Mark the level of the starter on the jar with a rubber band or marker. Wait 24 hours. **Day 2: First Observations** By Day 2, you might see little to no activity, or perhaps a few tiny bubbles. This is perfectly normal. The microbes are just beginning to wake up. Discard half of your starter (about 50 grams). Then, feed the remaining starter with 50 grams of fresh whole wheat/rye flour and 50 grams of unchlorinated water. Mix well, cover loosely, and return to its warm spot. Mark the new level. **Day 3-5: Building Momentum** From Day 3 onwards, you should start to see more consistent activity. You might notice more bubbles, a slight increase in volume after feeding, and a faintly sour or yeasty smell. The process remains the same: every 24 hours, discard all but 50 grams of your starter, then feed it with 50 grams of flour and 50 grams of water. Mix well, cover, and return to its warm spot. If your starter is very active and doubling in size quickly, you might consider feeding it every 12 hours instead of 24. This provides more frequent nourishment and can accelerate the process. Pay close attention to the aroma; it should evolve from a slightly unpleasant, acetone-like smell (common in early stages as different bacteria compete) to a more pleasant, yeasty, or fruity sour aroma. Learn more about identifying different sourdough starter aromas. **Day 6-7: The Mature Starter** By Day 6 or 7, your starter should be consistently active. After feeding, it should double in size within 4-8 hours, be full of bubbles, and smell pleasantly sour and yeasty. When you stir it, it should feel light and airy. This is a strong, mature starter, ready to bake with! To test its readiness, drop a small spoonful into a glass of water. If it floats, it's ready to use. If it sinks, it needs more time and possibly another feeding or two. Once mature, you can switch to feeding it with all-purpose flour if you prefer, or continue with whole wheat/rye for a more robust flavor. Congratulations, you've successfully learned how to make sourdough bread starter!

Troubleshooting and Maintaining Your Active Sourdough Starter

Freshly baked sourdough bread with seeds on a rustic wooden table setting. 
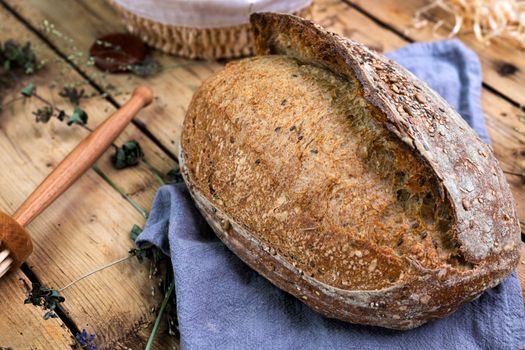
Photo: Jana Ohajdova / Pexels
Even after successfully learning how to make sourdough bread starter, you might encounter a few hiccups. Don't despair; most issues are easily resolved. One common problem is a slow or inactive starter. This can often be attributed to temperature. If your kitchen is too cold, the microbes will be sluggish. Try moving your starter to a warmer spot, like on top of the refrigerator, in an oven with just the light on (not the heat!), or in a proofing box. Another reason for inactivity could be chlorinated water or insufficient feeding. Ensure you're using unchlorinated water and feeding regularly. If your starter smells like nail polish remover (acetone), it's a sign it's very hungry and producing too much acetic acid. This means it needs to be fed more frequently or with a larger ratio of flour and water. Try feeding it every 12 hours, or increase the feeding ratio (e.g., 1:2:2 starter:flour:water instead of 1:1:1). Mold is a rare but serious issue. If you see fuzzy, colored spots (green, black, pink), discard the starter immediately and start over. A grayish liquid on top, called 'hooch,' is normal and indicates hunger. Simply stir it back in or pour it off before feeding. To maintain your active starter, once it's mature, you can store it in the refrigerator. This slows down its metabolism, meaning you only need to feed it once a week. When you want to bake, take it out of the fridge, let it come to room temperature, and feed it 1-2 times over 12-24 hours until it's active and bubbly again. If you plan to bake frequently, keeping it on the counter and feeding it daily is best. For long-term storage, you can dry your starter or freeze it. Drying involves spreading a thin layer on parchment paper and letting it air dry until brittle, then crumbling it and storing it in an airtight container. To reactivate, simply rehydrate with water and begin regular feedings. Freezing is also an option, though some find it less reliable for full recovery. Always keep a small backup portion if you're experimenting with storage methods. Remember, your starter is resilient; with a little attention and understanding, it will continue to provide you with delicious bread for years to come. **Quick Troubleshooting Tips:** * **Slow Starter:** Increase temperature, feed more frequently. * **Acetone Smell:** Feed more often, increase feeding ratio. * **Hooch:** Stir in or discard, then feed. * **Mold:** Discard immediately, start fresh. * **Weak Rise:** Ensure starter doubles consistently before baking. By following these guidelines, you'll not only learn how to make sourdough bread starter but also how to keep it vibrant and ready for all your baking adventures.

Comparison

FeatureWhole Wheat StarterRye StarterAll-Purpose Flour Starter
Initial ActivityFastVery FastSlower
Flavor ProfileMildly tangy, earthyRobust, very tangyMilder, less complex
MaintenanceEasyEasyEasy
Gluten ContentHighLowHigh
Starter ConsistencyThick batterVery stickySmooth batter

What Readers Say

"This guide on how to make sourdough bread starter was incredibly detailed and easy to follow. My starter, 'Bubbles,' is now thriving on day 7, and I can't wait to bake my first loaf!"

Sarah J. · Austin, TX

"I've tried making a starter before and failed, but this article explained everything so clearly. The troubleshooting section was particularly helpful, and my starter is finally active and bubbly."

Mark D. · Portland, OR

"Following these steps, I successfully created a robust sourdough starter in just six days. Now I'm consistently baking delicious, airy sourdough loaves that my whole family loves."

Emily R. · Denver, CO

"The instructions were excellent, though my kitchen was a bit cold, so it took an extra day for my starter to get really active. Still, the advice on temperature helped me adjust, and it's now doing great."

David L. · Chicago, IL

"As a beginner baker, I was intimidated by sourdough, but this guide made how to make sourdough bread starter feel approachable. The daily ritual explanation was perfect for keeping me on track."

Jessica M. · Miami, FL

Frequently Asked Questions

What is the best type of flour to start a sourdough starter?

Whole wheat or rye flour is generally recommended for starting a sourdough starter. These flours contain more natural microbes and nutrients, which can help kickstart the fermentation process more quickly and robustly compared to all-purpose white flour. Once established, you can transition to feeding with all-purpose flour if desired.

My starter isn't bubbling; is it dead?

Not necessarily! Lack of bubbles, especially in the first few days, is common. It could be due to a cool kitchen temperature, chlorinated water, or simply that the microbial community is still establishing itself. Try moving it to a warmer spot, ensure you're using unchlorinated water, and continue with daily feedings. Patience is key.

How often should I feed my sourdough starter?

During the initial creation phase, you should feed your starter every 24 hours. Once it's mature and active, if kept at room temperature, it benefits from daily feeding. If stored in the refrigerator, it only needs to be fed once a week. Always feed it 1-2 times before baking after refrigeration.

Is making a sourdough starter expensive?

No, making a sourdough starter is very inexpensive. It only requires flour and water, which are common pantry staples. The main 'cost' is your time and patience during the initial week or so of cultivation. A glass jar and a kitchen scale are the only other necessary (but often already owned) items.

How does a sourdough starter compare to commercial yeast?

Sourdough starter uses wild yeasts and bacteria, resulting in a more complex flavor profile (tangy, earthy) and a slower rise. Commercial yeast is a single, cultivated strain of yeast that provides a faster, more predictable rise and a milder flavor. Sourdough bread is also often easier to digest due to the fermentation process.

Who should try making a sourdough starter?

Anyone interested in baking artisan-quality bread at home, those looking for a more natural leavening agent, or individuals who enjoy the process of cultivating and nurturing a living ingredient will find great satisfaction in making a sourdough starter. It's a rewarding project for bakers of all skill levels.

Can a sourdough starter go bad or become unsafe?

While a sourdough starter is quite resilient, it can go bad if mold develops. If you see any fuzzy, colored spots (green, black, pink), it's best to discard the starter and begin anew. A grayish liquid (hooch) is normal and indicates hunger, not spoilage. A healthy starter should smell pleasantly sour or yeasty, not foul.

What are the future trends in sourdough baking?

Future trends in sourdough baking include a greater emphasis on regional flours and grains, experimentation with different starter cultures for unique flavor profiles, and increased interest in gut-health benefits. There's also a growing community sharing starter cultures and knowledge, fostering innovation and accessibility in home baking.

Mastering how to make sourdough bread starter is the first step towards a world of delicious, homemade bread. With patience and consistent care, you'll cultivate a vibrant starter that will bring unparalleled flavor and texture to your baking. Embrace the journey, and enjoy the incredible rewards of your own living leavening agent.

Topics: how to make sourdough bread startersourdough starter recipehomemade sourdough startersourdough starter guidenatural yeast starter
Leo List
Brampton weed
Adultwork